Kisi-kisi Soal UTS dan UAS Elektronika Beserta Jawaban

SOAL A 1) Berikut ini yang termasuk komponen elektronika dengan jenis komponen pasif yaitu ....

Kisi-kisi Soal UTS dan UAS Sistem Terdistribusi Beserta Jawaban

SOAL A 1. Berikut ini yang merupakan karakteristik dari definisi sistem terdistribusi adalah ....

Remove Bios Password and Harddissk (HDD) Laptop

I think to remove the bios password on an average PC is already can, although without having to memorize the password. the system jumpers or removing battery bios. ever see a supervisor, admin, system, HDD, bios, setup password?

Memperbaiki Kick Starter Motor Matic

Motor Matic is a motor that is the easiest to use and most in our homeland. please note that the motor also takes care of very sensitive, just like a computer that also takes care of sensitive anyway.

Gejala Kerusakan Mesin Air Submersible Metabo

Mesin Air Submersible atau yang sering disebut kebanyakan orang (satelit) ini sangat bagus, dengan sistemnya yang canggih dan fleksible. tipe mesin yang berbasis kerja di dalam tanah dan hanya menggunakan satu pipa ini, sangat berguna untuk anda yang memiliki banyak lumpur atau air kuning setelah pengeboran.

Showing posts with label Internet. Show all posts

16 October 2025

Complete Git & GitHub Tutorial for Beginners: Managing Code Made Easy

In the modern programming world, Git and GitHub have become essential tools developers use to manage and share code. However, for those just starting, these tools might seem intimidating. Don't worry! This article will provide a comprehensive Git and GitHub tutorial from the basics to being ready for real-world projects.

What Are Git and GitHub?

Git: The Intelligent Version Control System

Git is a version control system that functions to track every change made to your program's code. Imagine Git as a time machine for your code—you can view the change history, revert to previous versions, or work on several features simultaneously without fear of breaking the main code.

Simple analogy: Git is like the "history" feature in Google Docs, but much more powerful and specifically designed for program code.

GitHub: The Social Platform for Programmers

GitHub is a cloud-based platform that stores code managed with Git. If Git is the engine, then GitHub is the garage—a place to store, share, and collaborate with other developers.

Fundamental Differences: Git vs. GitHub

GitGitHub
Local version control system on your computerOnline hosting platform
Installed on your personal computerAccessed via a website
Manages code changesStores and shares code
Free and open-sourceFree for public projects

Initial Steps to Start with Git & GitHub

1. Install Git on Your Computer

  • Download Git from git-scm.com

  • Install with default settings (according to your operating system)

  • Verify the installation by opening a terminal/CMD and typing: git --version

2. Create a GitHub Account

  • Visit github.com

  • Sign up with your email, username, and password

  • Verify your email address

3. Initial Git Configuration

After installation, perform the basic configuration:

bash
git config --global user.name "your-name"
git config --global user.email "your-email@gmail.com"

Practical Guide to Using Git & GitHub

How to Create a Repository on GitHub

  1. Log in to your GitHub account.

  2. Click the "New" or "+" button in the top right corner.

  3. Enter a repository name (e.g., my-first-project).

  4. Add a description (optional).

  5. Choose Public (free) or Private.

  6. Check the box for "Add a README file".

  7. Click "Create repository".

Upload Your First Project to GitHub

bash
# Navigate to your project folder
cd path/to/project/folder

# Initialize a Git repository
git init

# Add all files to the staging area
git add .

# Create the first commit
git commit -m "Initial commit - first project"

# Connect to your GitHub repository
git remote add origin https://github.com/username/repository-name.git

# Upload to GitHub
git push -u origin main

Clone an Existing Repository

bash
# Copy the repository URL from GitHub
git clone https://github.com/username/repository-name.git

Key Concepts in Git

1. Branch: Code Branches for Experimentation

Branches allow you to work on new features without interfering with the main code.

bash
# Create a new branch
git branch new-feature

# Switch to that branch
git checkout new-feature

# Or, create and switch simultaneously
git checkout -b new-feature

2. Commit: Snapshots of Your Changes

Each commit is a snapshot of your code changes.

bash
# Check the status of changes
git status

# Add a specific file
git add filename.html

# Or, add all files
git add .

# Create a commit with a descriptive message
git commit -m "Add user login feature"

3. Push & Pull: Synchronizing with GitHub

bash
# Upload local changes to GitHub
git push origin branch-name

# Download the latest changes from GitHub
git pull origin branch-name

Development Workflow with Git

Standard Workflow

  1. Pull the latest changes from the main branch.

  2. Create a new branch for the feature you're working on.

  3. Commit changes regularly.

  4. Push the branch to GitHub.

  5. Create a Pull Request to merge it into the main branch.

  6. Review code and merge.

Example Daily Workflow

bash
# Start the day by updating to the latest code
git pull origin main

# Create a branch for today's feature
git checkout -b payment-feature

# Work and commit periodically
git add .
git commit -m "Implement bank transfer payment method"

# Stash work temporarily (if you need to switch context)
git stash

# Upload to GitHub
git push origin payment-feature

Benefits of Using GitHub in Your Programming Career

1. A Living Digital Portfolio

GitHub serves as a digital CV that showcases your skills and contributions.

2. Efficient Team Collaboration

  • Multiple developers can work on the same project.

  • Track changes and see who did what.

  • Integrated code review.

3. Backup and Security

Your code is safely stored in the cloud, so you don't have to worry about loss if your computer fails.

4. Continuous Integration/Deployment

With GitHub Actions, you can automate testing and deployment.

Git & GitHub Best Practices

Good Commit Messages

❌ Badfix bug
✅ GoodFix email input validation on registration form

Branch Naming Convention

  • feature/login-authentication

  • bugfix/fix-null-pointer-exception

  • hotfix/critical-security-patch

Commit Regularly

Avoid bundling large changes into a single commit. Small, frequent commits are easier to track.

Conclusion

Mastering Git and GitHub is no longer optional but a necessity for every modern developer. With this tutorial, you now have a solid foundation to:

  • ✅ Manage code versions neatly

  • ✅ Collaborate with developer teams

  • ✅ Build a programming portfolio

  • ✅ Become a more organized programmer

Action Steps Now:

  1. Install Git on your computer.

  2. Create a GitHub account.

  3. Try creating your first repository.

  4. Practice with a small project.

Don't be afraid to experiment and make mistakes—it's part of the learning process! GitHub has a very supportive community for beginner developers.

Happy coding! ðŸš€

Share:

07 February 2017

Cara Memasang Keywords dengan Meta di Blogger

Sebenernya mesin pencari sudah tidak lagi menggunakan meta keywords sebagai salah satu faktor penentu rangking. Tapi bagi sobat yang tetap kepengin memasang meta keywords di blogger, di bawah ini adalah tutorialnya. Ada dua jenis meta keywords yang bisa digunakan di blogger. Pertama meta keywords otomatis dan yang kedua meta keywords manual.
Cara memasang meta keywords otomatis
<b:if cond='data:blog.homepageUrl == data:blog.url'><meta expr:content='data:blog.title' name='keywords'/></b:if>
<b:if cond='data:blog.pageType == &quot;item&quot;'><meta expr:content='data:blog.pageName' name='keywords'/></b:if>
Cara memasang meta keywords manual
<b:if cond='data:blog.homepageUrl == data:blog.url'>
<meta content='Katakunci1, Katakunci1, Katakunci1' name='keywords'/>
</b:if>
<b:if cond='data:blog.pageType == &quot;item&quot;'>
<meta content='Katakunci2, Katakunci2, Katakunci2' name='keywords'/>
</b:if>
  • Ganti Katakunci1 dengan kata kunci untuk halaman depan blog sobat
  • Ganti Katakunci2 dengan kata kunci untuk halaman postingan blog sobat


Jika menggunakan cara di bawah ini, kata kunci pada meta keywords akan otomatis mengambil dari judul blog dan juga judul postingan.
#1. Login ke blogger.com dan masuk ke dashboard blog sobat.
#2. Klik menua “Template
#3. Klik “Edit HTML
#4. Letakan kode di bawah ini tepat di bawah kode <head>:
#5. Jika sudah, klik “Simpan template
Meta keywords manual
Meta keywords manual artinya sobat harus memasukan kata kunci secara manual pada kode meta keywords.
#1. Login ke blogger.com dan masuk ke dashboard blog sobat.
#2. Klik menua “Template
#3. Klik “Edit HTML
#4. Letakan kode di bawah ini tepat di bawah kode <head>
<b:if cond='data:blog.homepageUrl == data:blog.url'>
 <meta content='Katakunci1, Katakunci1, Katakunci1' name='keywords'/>
</b:if>    
<b:if cond='data:blog.pageType == &quot;item&quot;'>
 <meta content='Katakunci2, Katakunci2, Katakunci2' name='keywords'/>
</b:if>
#5. Jika sudah, klik “Simpan template
Begitulah kira-kira tutorial mudah dan nggak pakai ribet tentang cara memasang meta keywords di blogger.com. Mudah-mudahan bermanfaat.
Share:

How To Remove Index or deindex from Google quickly and fast

How I deindexed my website from Google in a short span of time of not more than five hours. Yup, it may sound bit strange for some folks that why somebody want to deindex website from Google though on the other side indexing website or posts is a big headache for some folks.


STEPS TO DEINDEX SITE COMPLETELY FROM GOOGLE
1. Blog Settings
First of all I go to blogger because its a blogspot domain, after that from blog settings > basic > Privay - click on edit and then mark check on 2nd line 2nd option to not allow search engines to find your blog. After that tap on Save Changes button.

2. Google Webpage Removal Tool
After that I go to Google webmaster tools to not even deindex post but also to remove its cache page from Google search. For that I go to site dashboard > Click on Google Index from left sidebar > And then I select Remove URLs from drop down. After that I clicked on create a new removal request button from right section and then paste the 2nd part of url (after .tld/) of post in field in the url-input field, the post which I placed as static on my website homepage. And then click on continue button. Then I proceeded to the next page where I got three different url removal options:
  • Remove page from search results and cache
  • Remove page from cache only
  • Remove directory

I go with the first option and then did a click on submit request button for complete url removal submission. And then I repeat the same process by submitting new removal request but with blank field. But keep in mind the complete domain removal with all instances via webmaster tools is temporary (approximately for 3 month). For permanent complete content removal you must need to block website via robots.txt.

3. Deindex Site From Google and Other Search Engines Via Robots.Txt File
How To Deindex Website From Google
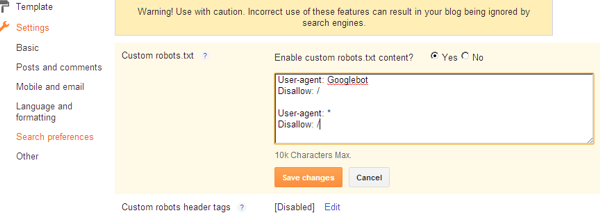
So, again I go back to my blogger blog dashboard > search preferences > from Crawlers and indexing section I enable custom robots.txt content. And then I copy paste following code in the field to not allow bots of all search engines especially of Google to crawl my site pages anymore in future. After all hit save changes button.
User-agent: Googlebot
Disallow: /
User-agent: *
Disallow: /
Keep in mind that do not use empty disallow " disallow: ", because it means disallow nothing from this domain.

4. Make Website No Index Via Meta Tags
Now here is the last and one of the most effective step is to apply a meta robots noindex tag throughout the site. Once again i go to blogger blog dashboard > Template > Edit HTML > and then just below <head> line I placed this piece of code to shut the all search engines out from indexing and crawling my entire site.

<meta name="robots" content="noindex, nofollow">

And then finally click on save template button.
In last after applying all methods to remove site from search results I finally used a fetch as Google service and submit my domain url with all linked pages. I did this to send Google bots on website to crawl so that they can quickly find that this site is now de-indexed by various methods. After submitting url to fetch it, tool will show success in results but, when you see the same url after few hours the word success with green mark should turned into Denied by robots.txt with yellow mark if everything worked properly.
Then I go to my bed to take some sleep because in the early morning just after 5 hours I have to go university for some documentation and industrial visits. After about 4.5 hours before leaving to catch the bus for university I open my machine to check my site's status, a kind of slightly devilish smile appeared on my face after seeing the website which I ranked with a lot of hard work is finally deindexed by myself just because of my small mistake.

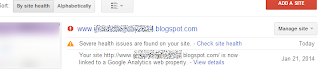
I confirmed my website removal from search engines especially Google by typing the exact url in search field and I didn't saw any result from my site. By the way as second proof I saw a severe health issues icons in webmaster tools rich snippet.
How To Deindex Website From Google
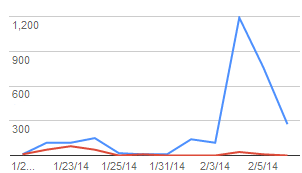
After 2-3 days, from site's webmaster tools dashboard overview, I witnessed there was a big significant drop in search queries graph. Look at the following screenshot:
How To Deindex Website From Google
In last I would like to make clear one more thing that I can not guarantee that after how much time Google will stop indexing your site. Because time required for a complete website removal from search results also depends on the size of website (number of indexed pages, etc.). But I'm quite much sure I you will follow all the steps mentioned above to remove site from google index and search results of all search engines then I'm quite sure It will not take a time more than a day, no matter how many pages your website has.
Share:

Blog Archive