Kisi-kisi Soal UTS dan UAS Elektronika Beserta Jawaban

SOAL A 1) Berikut ini yang termasuk komponen elektronika dengan jenis komponen pasif yaitu ....

Kisi-kisi Soal UTS dan UAS Sistem Terdistribusi Beserta Jawaban

SOAL A 1. Berikut ini yang merupakan karakteristik dari definisi sistem terdistribusi adalah ....

Remove Bios Password and Harddissk (HDD) Laptop

I think to remove the bios password on an average PC is already can, although without having to memorize the password. the system jumpers or removing battery bios. ever see a supervisor, admin, system, HDD, bios, setup password?

Memperbaiki Kick Starter Motor Matic

Motor Matic is a motor that is the easiest to use and most in our homeland. please note that the motor also takes care of very sensitive, just like a computer that also takes care of sensitive anyway.

Gejala Kerusakan Mesin Air Submersible Metabo

Mesin Air Submersible atau yang sering disebut kebanyakan orang (satelit) ini sangat bagus, dengan sistemnya yang canggih dan fleksible. tipe mesin yang berbasis kerja di dalam tanah dan hanya menggunakan satu pipa ini, sangat berguna untuk anda yang memiliki banyak lumpur atau air kuning setelah pengeboran.

06 February 2020

Cara instalasi dan mempergunakan trixbox

Trixbox adalah sebuah VoIP server yang dibundel menjadi
satu dengan system operasi, yaitu Linux CentOS. Trixbox
bersifat open source, artinya setiap orang dapat mengetahui
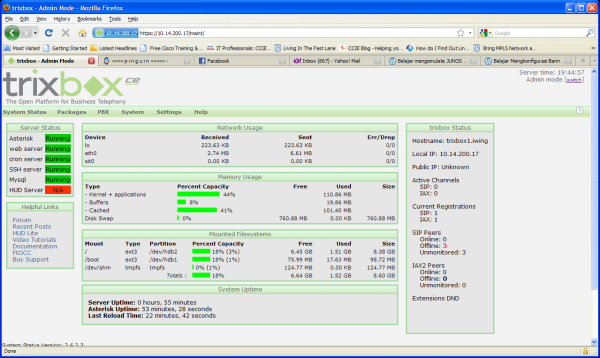
source code programnya dan memperolehnya secara gratis.

Trixbox terdiri dari komponen-komponen sebagai berikut:
1. Sistem operasi   : CentOS Linux
2. Database    : MySQL
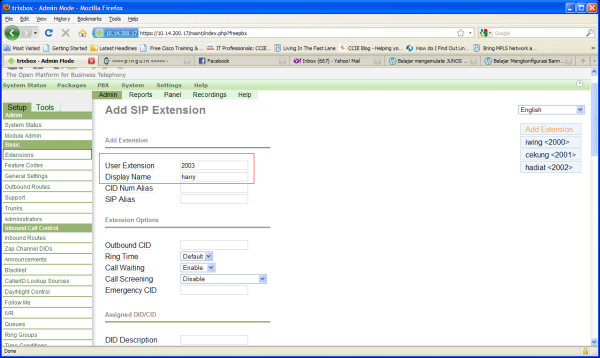
3. VoIP server      : Asterisk
4. Tampilan GUI    : FreePBX

Trixbox dapat diinstal di komputer PC biasa, tidak harus
computer server. Untuk PC biasa, kebutuhan minimal untuk
dapat menginstal Trixbox sebagai berikut:

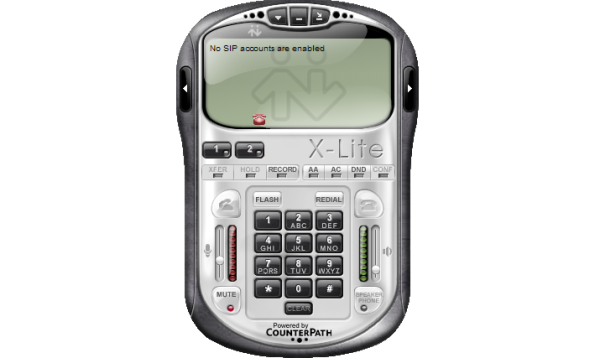
1. Pentium II 350 MHz
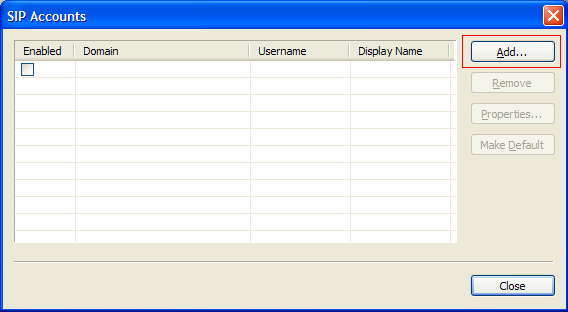
2. Memory 256 MB
3. Harddisk dengan ruang minimal 4 GB
4. LAN card 10/100 Mbps
5. CD-ROM


Pada percobaan kali ini, saya mempergunakan :
[i].   1 Buah komputer untuk Server Trixbox
[ii].  1 Buah komputer untuk client (softphone)
[iii]. 1 Buah IP-Phone D-link (GLV-515)
[iv].  1 Buah Switch 10/100 Mbps
[v].   Kabel Utp secukupnya
--------------------------------------------------
Langkah-langkah menginstall trixbox, yaitu :
--------------------------------------------------
[a]. Siapkan CD instalasi Trixbox
[b]. Pastikan bahwa setting pada BIOS akan mem-boot
 CD-ROM pertama kali, ubah terlebih dahulu jika
 setting BIOS belum benar
[c]. Masukkan CD Trixbox dan restart komputer.
 Tunggu hingga muncul tampilan berikut

[1].
--------------------------------------------------
--------------------------------------------------
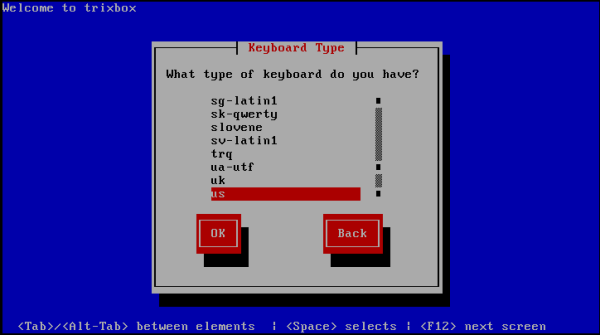
[2]. Selanjutnya ikuti perintah yang muncul ^_^...
 Pemilihan Keyboard Type
--------------------------------------------------
--------------------------------------------------
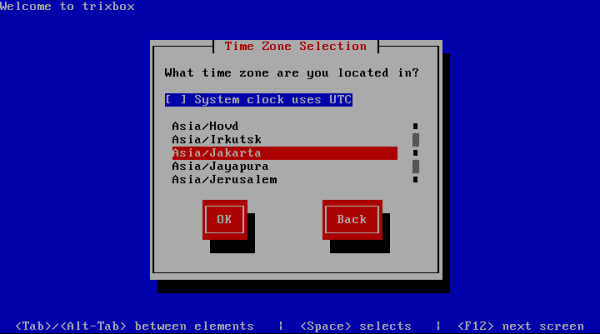
[3]. Pemilihan Time Zone
--------------------------------------------------
--------------------------------------------------
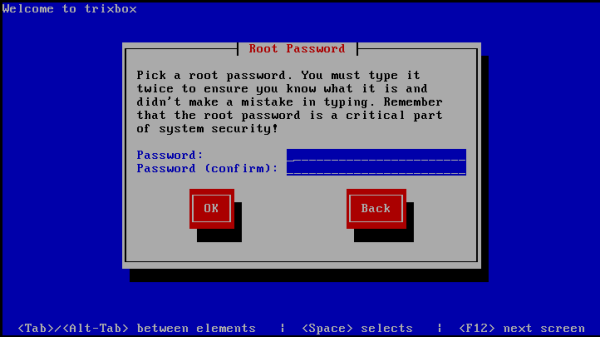
[4]. Pengisian root password
--------------------------------------------------
--------------------------------------------------
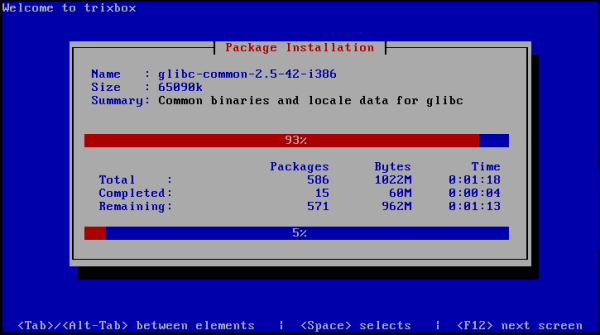
[5]. Memulai Proses Instalasi
--------------------------------------------------
--------------------------------------------------
[6].
--------------------------------------------------
--------------------------------------------------
[7]. Menginstall bootloader
--------------------------------------------------
--------------------------------------------------
[8]. Booting Trixbox
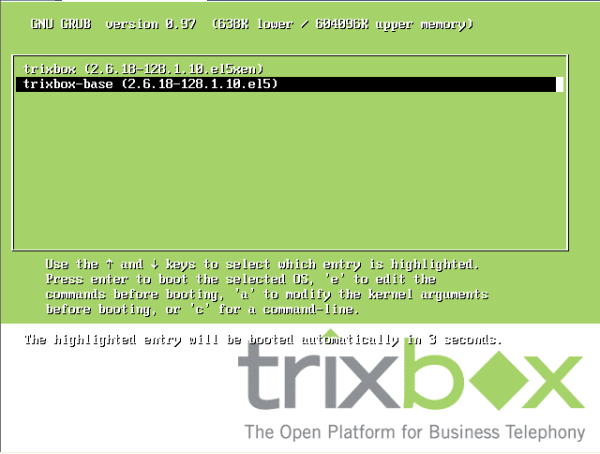
--------------------------------------------------
--------------------------------------------------


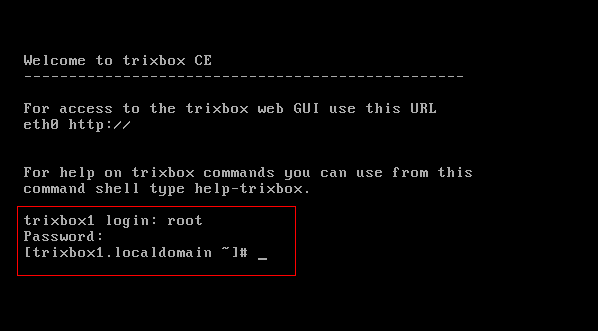
[9]. Pengisian user dan password login. mode CLI
--------------------------------------------------
--------------------------------------------------
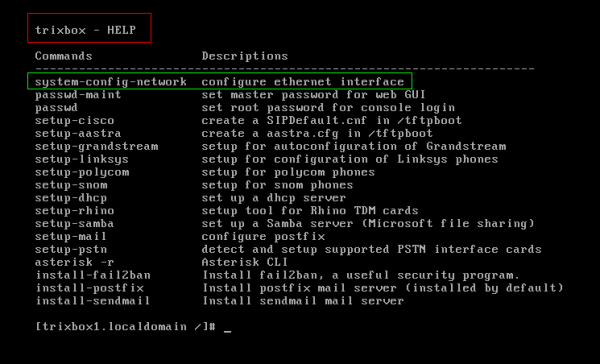
[10].
--> untuk pertolongan ketikan help-trixbox
--> lalu untuk mengkonfigurasi ethernet interface,
 ketikan system-config-network
--------------------------------------------------
--------------------------------------------------
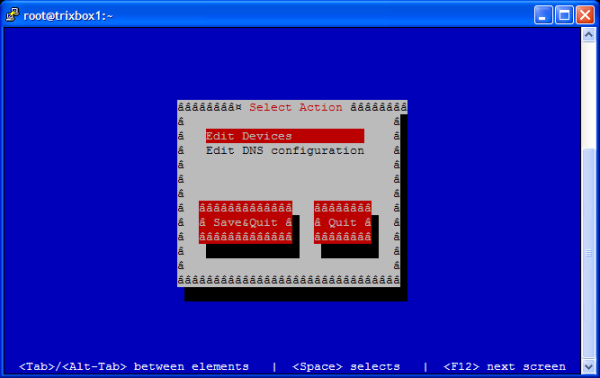
[11]. Edit Devices
--------------------------------------------------
--------------------------------------------------
[12]. Pilih interface yang akan dipergunakan
--------------------------------------------------
--------------------------------------------------
[13]. Pilih ingin static IP atau DHCP
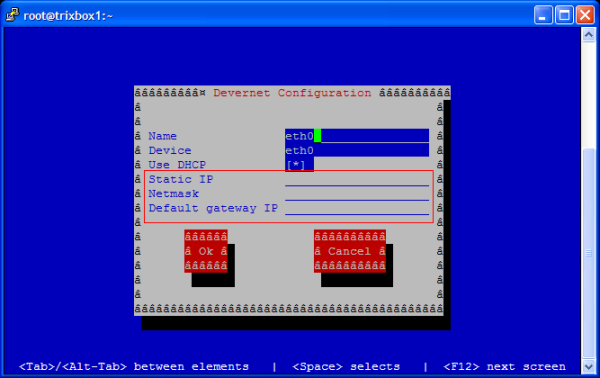
--------------------------------------------------
--------------------------------------------------
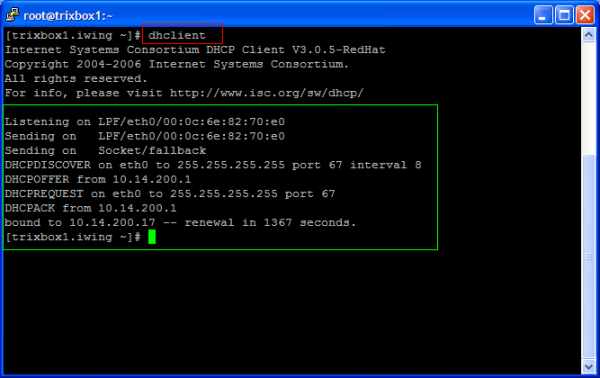
[14].Karena di lab menggunkan DHCP, maka saya me-request
 ip dari DHCP Server, IP yang didapat adalah
 10.14.200.17/24
--------------------------------------------------
--------------------------------------------------
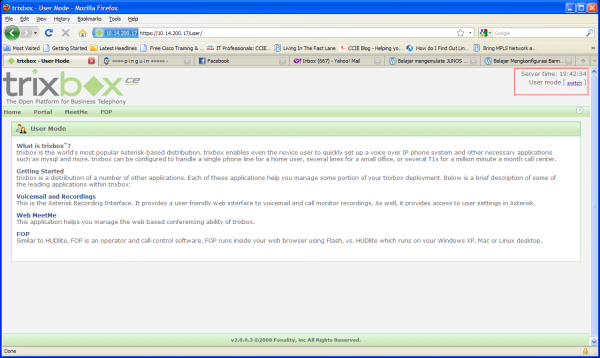
[15].Untuk mempermudah konfigurasi, kita akan memakai
 bantuan GUI, buka browser dari komputer lain, ketikan
 https://10.14.200.17, rubah dari mode user ke
 mode admin
--------------------------------------------------
--------------------------------------------------
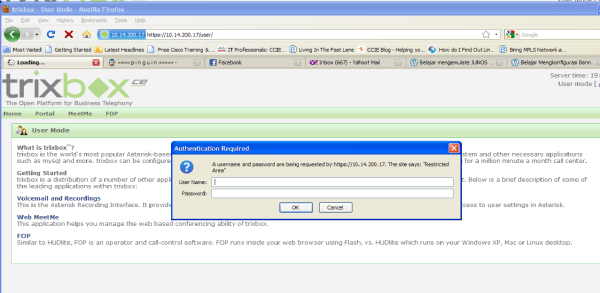
[16].Jika muncul permintaan user dan password, isi dengan
 user=maint dan password=password, untuk merubah
 password maint, di cli server ketikan passwd-maint
--------------------------------------------------
--------------------------------------------------
[17].
--------------------------------------------------
--------------------------------------------------
[18].Pilih PBX Settings
--------------------------------------------------
--------------------------------------------------
[19].Pilih Extensions,Add extension, Device:Generic
 SIP device, Submit
--------------------------------------------------
--------------------------------------------------
[20].Example:
 User Extension : 2003
 Display Name   : harry
 secret         : xxxx
--------------------------------------------------
--------------------------------------------------
[21].
--------------------------------------------------
--------------------------------------------------
[22]. Submit dan Apply Configuration Changes
--------------------------------------------------
--------------------------------------------------
[23]. Continue with Reload, sampai posisi ini konfigurasi
 sederhana server trixbox selesai.
--------------------------------------------------
--------------------------------------------------


[24]. Untuk Client kita menggunakan 1 buah soft-phone
 (x-lite) dan 1 biah IP-Phone GLV-515 (D-Link)
--------------------------------------------------
--------------------------------------------------
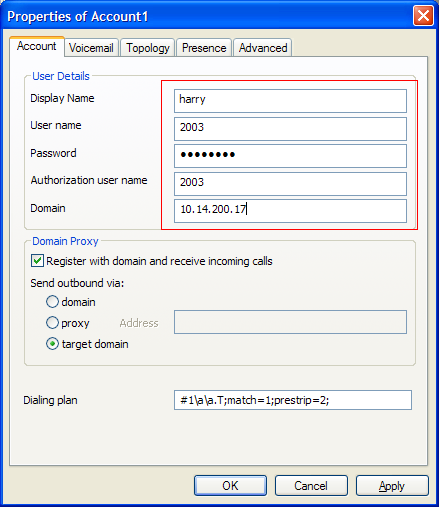
[25]. Pada X-lite, klik kanan, Sip account settings
 Add
--------------------------------------------------

--------------------------------------------------
[26]. di Account isikan:
 example :
 Display name : harry
 User name : 2003
 password : xxxx
 dll...
--------------------------------------------------
--------------------------------------------------
[27].Jika tidak ada masalah maka di x-lite akan muncul
 tulisan Ready, "Your username is 2003"
--------------------------------------------------
 --------------------------------------------------
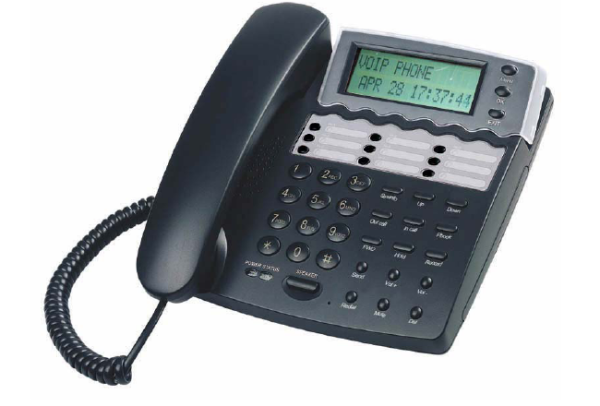
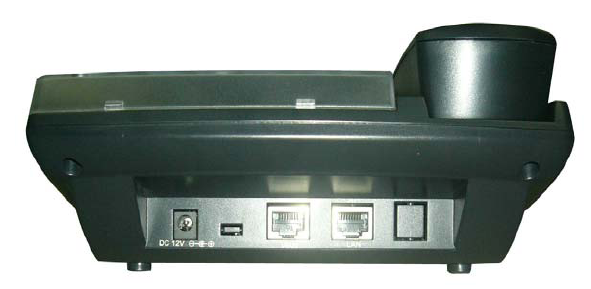
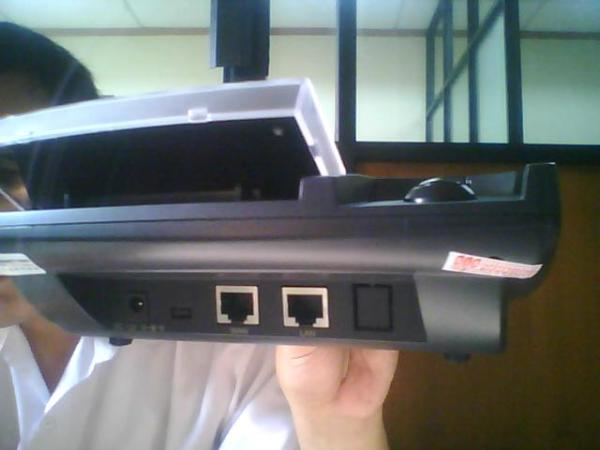
[28].Ip phone yang digunakan adalah produk D-link
 (GLV-515), Bentuk fisiknya adalah seperti berikut:
--------------------------------------------------
a.
b.

c.
d.
--------------------------------------------------


[29].Di Ip-phone parameter minimal yang diisi adalah
 sebagai berikut:
--------------------------------------------------
 --------------------------------------------------

[30]. Untuk pengujian, softphone (x-lite) dengan user
 2003, akan menghubungi Ip-phone GLV-515 dengan
 user 2000, berikut merupakan screenshoot di Ip-
 phone ketika dihubungi oleh user 2003 (harry)


--------------------------------------------------
 --------------------------------------------------
Sekian dan mudah-mudahan dapat bermanfaat..


Share:

03 February 2020

Decision Tree on Spyder (Anaconda) - Python 3.7

1. Install Anaconda in Ubuntu (previous post)

conda install -c anaconda anaconda-navigator

2. Install these library for decision tree

pip install sklearn
conda install pandas       # i can use pip
pip install pydotplus
pip install matplotlib
conda install python-graphviz

3. Go to Anaconda Navigator

anaconda-navigator

4. Follow the tutorial
https://scikit-learn.org/stable/modules/tree.html
Share:

How to install keras and matplotlib in Anaconda with tensorflow_env

- activate tensorflow_env
- conda install -c anaconda keras
- conda install -c conda-forge matplotlib

### KERAS
WARNING: The conda.compat module is deprecated and will be removed in a future release.
Collecting package metadata: done
Solving environment: done


==> WARNING: A newer version of conda exists. <==
  current version: 4.6.11
  latest version: 4.6.14

Please update conda by running

    $ conda update -n base -c defaults conda


## Package Plan ##

  environment location: C:\Anaconda3\envs\tensorflow_env

  added / updated specs:
    - keras


The following packages will be downloaded:

    package                    |            build
    ---------------------------|-----------------
    ca-certificates-2019.1.23  |                0         158 KB  anaconda
    certifi-2019.3.9           |           py37_0         155 KB  anaconda
    keras-2.2.4                |                0           5 KB  anaconda
    keras-base-2.2.4           |           py37_0         489 KB  anaconda
    ------------------------------------------------------------
                                           Total:         808 KB

The following NEW packages will be INSTALLED:

  keras              anaconda/win-64::keras-2.2.4-0
  keras-base         anaconda/win-64::keras-base-2.2.4-py37_0

The following packages will be UPDATED:

  openssl              pkgs/main::openssl-1.1.1b-he774522_1 --> anaconda::openssl-1.1.1-he774522_0

The following packages will be SUPERSEDED by a higher-priority channel:

  ca-certificates                                 pkgs/main --> anaconda
  certifi                                         pkgs/main --> anaconda


Proceed ([y]/n)? y


Downloading and Extracting Packages
certifi-2019.3.9     | 155 KB    | ############################################################################ | 100%
keras-2.2.4          | 5 KB      | ############################################################################ | 100%
keras-base-2.2.4     | 489 KB    | ############################################################################ | 100%
ca-certificates-2019 | 158 KB    | ############################################################################ | 100%
Preparing transaction: done
Verifying transaction: done
Executing transaction: done


### MATPLOTLIB
WARNING: The conda.compat module is deprecated and will be removed in a future release.
Collecting package metadata: done
Solving environment: done


==> WARNING: A newer version of conda exists. <==
  current version: 4.6.11
  latest version: 4.6.14

Please update conda by running

    $ conda update -n base -c defaults conda


## Package Plan ##

  environment location: C:\Anaconda3\envs\tensorflow_env

  added / updated specs:
    - matplotlib


The following packages will be downloaded:

    package                    |            build
    ---------------------------|-----------------
    ca-certificates-2019.3.9   |       hecc5488_0         184 KB  conda-forge
    certifi-2019.3.9           |           py37_0         149 KB  conda-forge
    cycler-0.10.0              |             py_1           8 KB  conda-forge
    kiwisolver-1.1.0           |   py37he980bc4_0          61 KB  conda-forge
    matplotlib-3.0.3           |           py37_1           6 KB  conda-forge
    matplotlib-base-3.0.3      |   py37h3e3dc42_1         6.6 MB  conda-forge
    openssl-1.1.1b             |       hfa6e2cd_2         4.8 MB  conda-forge
    ------------------------------------------------------------
                                           Total:        11.7 MB

The following NEW packages will be INSTALLED:

  cycler             conda-forge/noarch::cycler-0.10.0-py_1
  kiwisolver         conda-forge/win-64::kiwisolver-1.1.0-py37he980bc4_0
  matplotlib         conda-forge/win-64::matplotlib-3.0.3-py37_1
  matplotlib-base    conda-forge/win-64::matplotlib-base-3.0.3-py37h3e3dc42_1

The following packages will be UPDATED:

  ca-certificates     anaconda::ca-certificates-2019.1.23-0 --> conda-forge::ca-certificates-2019.3.9-hecc5488_0

The following packages will be SUPERSEDED by a higher-priority channel:

  certifi                                          anaconda --> conda-forge
  openssl                anaconda::openssl-1.1.1-he774522_0 --> conda-forge::openssl-1.1.1b-hfa6e2cd_2


Proceed ([y]/n)? y


Downloading and Extracting Packages
ca-certificates-2019 | 184 KB    | ############################################################################ | 100%
kiwisolver-1.1.0     | 61 KB     | ############################################################################ | 100%
openssl-1.1.1b       | 4.8 MB    | ############################################################################ | 100%
matplotlib-3.0.3     | 6 KB      | ############################################################################ | 100%
matplotlib-base-3.0. | 6.6 MB    | ############################################################################ | 100%
certifi-2019.3.9     | 149 KB    | ############################################################################ | 100%
cycler-0.10.0        | 8 KB      | ############################################################################ | 100%
Preparing transaction: done
Verifying transaction: done
Executing transaction: done


Share:

How To Install Tensorflow in Ubuntu 18.04.2 LTS

My spec
First
This article using Anaconda
1. Download in https://www.anaconda.com/distribution/#download-section with Linux Installer
2. Install Python, pip3:

sudo apt update
sudo apt install python3-dev python3-pip
sudo pip3 install -U virtualenv

- for using conda i must install pip version:

sudo apt install python-pip

- Install conda:

pip install conda

- if any error:

pip install --upgrade pip
python3 -m pip install --upgrade pip
pip --version

3. create a new conda environment containing TensorFlow and activate it

conda create -n tensorflow_env tensorflow
conda activate tensorflow_env

4. Select conda to activate the main environment (base):

source /my_anaconda_path/bin/activate

5. Test my installation

python

so run inside python

import tensorflow as tf

or follow as:

https://www.tensorflow.org/tutorials/


THIS TUTORIAL ALSO WORKED IN MY WINDOW10 CPU
Share:

02 February 2020

How To Add OpenCV on Anaconda in Ubuntu 18.04.2 LTS and Windows10

1. Create opencv environment

conda create -n opencv_env

2. Activate

conda activate opencv_env

3. Install opencv contrib python

pip install opencv-contrib-python

Now test with type "python"

import cv2
cv2.__version__


Share:

Blog Archive